How to Upload Audio Files to Audio Tool
When you create a new Pro Tools session, you can cull the bit depth, sampling charge per unit, and file type of that session, with the audio file type being Broadcast Wave (.wav) or AIFF (.aif). This means that any audio recorded in the new session will exist of the same file type. Notwithstanding, Pro Tools can import audio files of many formats, including MP3, SD1 and SD2, and unprotected .M4a and .aac files. When importing audio files that differ from the selected file type, Pro Tools volition convert those files to match the file type of your current session.
There are two ways to import sound files into a Pro Tools session: you tin employ the Import Audio control or simply drag the files into the Pro Tools session.
- Import Sound command
- Add together sound files
- Click Done
- Adjust Audio Import options
- Drag and drop
Import Sound command
- To import files with the Import Audio control from the Menu bar, clickFile > Import > Sound (or use the keyboard shortcutShift+Command+I).
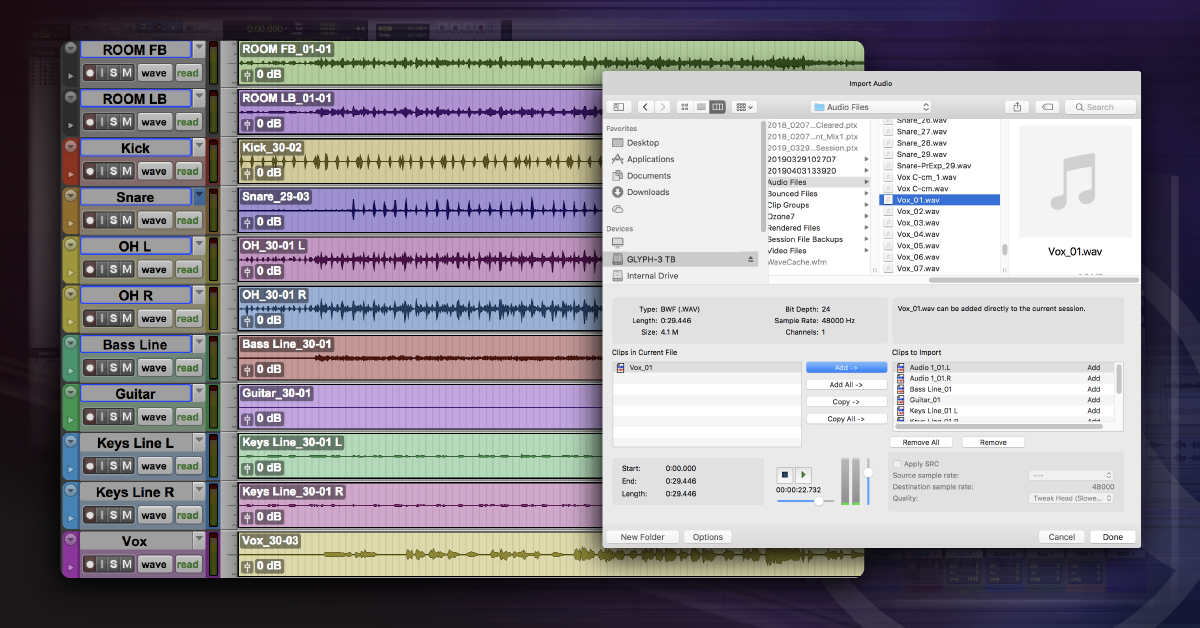
- In theImport Audio window, locate and select the desired audio file.
- Add the audio files, click Done, then adapt the Audio Input settings as needed.
If you demand to listen to the selected audio clip before importing it, click thePlay push near the lesser of the Import Sound box. The vertical slider will accommodate the playback volume of the prune, while the horizontal slider lets you curlicue through the prune to listen to a specific location inside the prune.
Locate and select the audio files.
When you select a file, it appears in theClips in Electric current File window. To add it to theClips to Import list, select that file and clickAdd orCopy. If the file you're importing is at a different sample charge per unit from your session, the Re-create push will modify to Catechumen, and that choice will be highlighted. While adding files with a dissimilar sampling rate to your session is possible, those files will play back at the wrong speed unless they are converted.
Yous can also select all the files in the Clips in Current File window past selecting Add All, Copy All, or Convert All. Should you lot demand to remove clips from the Import list, select the file you want to be removed from the list and click Remove (for a single file) or Remove All for everything in the Import listing.
If y'all selectAdd files to your electric current session (instead of Copy), then the audio files will stay in the source folder on the source drive where they currently reside. This will work as long as that drive is continued to your estimator. If you are adding files to your session from a collaborator's drive that they will have with them, yous must selectCopy to transfer the files to your local drive. It'due south a big deal and a "gotcha" that has caused many files to be declared "missing" when a session is opened.
Since all files in a session need to be at a single sample charge per unit (which was chosen when you created the session), any files that you import will need to be at the sampling rate of the session. Once you've selected the file (or files) yous want to add to your session, cheque to ensure that theApply SRC button is enabled. Pro Tools typically recognizes the sampling rate of the selected file and will automatically enable the SRC push. If it doesn't, you can manually specify the source sample rate and the Sample Charge per unit Conversion quality (higher-quality settings take more time, but the results more often than not audio improve).
ClickWashed. A new window will open up that asks where the copied and converted files should exist placed; the default location is the Sound Files folder in the electric current session. ClickOpen, or choose another location.
Click Washed.
Finally, the Audio Import Options window will open. This window lets you specify both the destination of the new file, also as the location in the session where the imported files volition go. ChoosingNew Rails will put each audio file into its own rail, and the Location menu allows y'all to choose to identify the track at theSession Start, theVocal Start (if you have a Vocal Showtime Marker), theSelection (which aligns the session start with the cursor), orSpot (opening the Spot window, which lets you place the file at a specific time in the session).
Arrange the Audio Import options
Elevate and drop
If you desire to drag files directly into the session from a Finder window. Though there are more steps, you have much more control over how your audio files are candy if you employ Import Audio rather than dragging files into the session, so the onetime is the recommended practice.
- Choose the file or files you lot want to import.
- Drag the file to either Clip list (which adds the file to the Prune list), to an existing rails (which will insert the file at the point in the track y'all put the cursor), or to an empty space in the Edit window (which will create a new runway).
Drag and driblet sound into Pro Tools.
Related Articles
When you need aid, Sweetwater has the answers!
Our knowledge base contains over 28,000 expertly written tech articles that will give you answers and help yous go the most out of your gear. Our pro musicians and gear experts update content daily to keep you informed and on your way. All-time of all, it'south totally FREE, and it's just another reason that you get more than at Sweetwater.com.

bridgeforthupeor1956.blogspot.com
Source: https://www.sweetwater.com/sweetcare/articles/how-to-import-audio-in-pro-tools/
0 Response to "How to Upload Audio Files to Audio Tool"
Post a Comment